Get in touch with DONGHE Company
-
Phone: +86 181-1645-5490
-
Email: Sales18@DongheScience.com

Setting Up Your Laboratory Diamond Wire Saw: Step-by-Step
Proper setup of a diamond wire saw is essential for achieving precise, efficient cuts while extending the lifespan of your equipment. This comprehensive guide walks you through every step of the process, from unboxing and inspection to calibration, operation, and maintenance. Following these detailed instructions will ensure stable precision cutting, minimize friction and heating, reduce wire wear, and maintain optimal cutting quality throughout the equipment’s operational life.
Unboxing the Diamond Wire Saw

Begin by carefully unpacking all components in a clean, organized workspace. Proper handling during this initial phase prevents contamination and damage that could affect performance later.
Essential Components Checklist
- Frame and sub-frame: The primary structural components
- Pulley wheels: Guide and support the wire during operation
- Precision endless wire loop: The cutting element with diamond beads
- Cooling and lubricant lines: Temperature control systems
- Assembly fixtures and feeding device: Sample positioning equipment
- Installation hardware: Bolts, brackets, and mounting components
Review the manufacturer’s material list thoroughly and verify that all items match your order specifications. Maintain a clean workspace free from debris to prevent contamination. Keep protective packing materials intact until the equipment is fully aligned and ready for operation.
Initial Inspection Procedures

Component Familiarization
Before powering on the machine, familiarize yourself with all controls and functions. This ensures safe and effective operation from the start.
- Examine the diamond wire and bead segments: Check for damage, wear, or manufacturing defects that could compromise cutting performance.
- Inspect pulleys and rotation mechanisms: Ensure pulleys spin freely without wobble or excessive play. Check that spools rotate smoothly.
- Verify wire path alignment: Confirm that guides, slides, and edge guards move freely and align with the intended cutting path.
- Test lubrication distributors: Ensure cooling systems are properly connected and positioned to reduce friction during operation.
- Check control systems: Verify that speed controllers, tension equipment, and sensors function correctly.
⚠️ Critical Inspection Points
Before turning on power, double-check for the following issues that could cause immediate problems:
- Chipped or damaged pulleys
- Twisted or kinked wire
- Excessive play in shafts or bearings
- Loose screws or misaligned components from shipping
- Contamination on wire surface (weld beads, abrasive particles, debris)
- Damaged guards or covers
Document all defects and contact your supplier immediately before operating the machine.
Workspace and Machine Setup

Preparing the Cutting Area
A well-prepared workspace is fundamental to achieving consistent, high-quality cuts. Position your cutting table on a solid, anti-vibration bench that provides stable support during operation.
✓ Workspace Best Practices
- Ensure bright, even illumination across the cutting area
- Maintain positive airflow controls for ventilation
- Design clear pathways for coolant delivery and drainage
- Secure drain lines to prevent spills and contamination
- Allow adequate space for blade/wire changes and spool access
- Position controls and switches within easy reach
- Verify that emergency stops are accessible
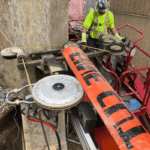
Installing the Diamond Wire Saw

Base and Frame Construction
Mount the saw on a rock-solid bench with vibration damping capabilities. The cutting string must maintain precision and steadiness during operation.
- Check base flatness: Use a level to verify the base is flat in all directions. Gradually counterbalance sections to prevent offset between opposite sides of the machine.
- Clean slide rails and guides: Remove any debris or contaminants, then apply appropriate lubrication to reduce friction.
- Install safety guards: Mount all guarding units securely to protect operators and samples.
- Verify alignment: Check that all components align properly with your cutting blocks or samples.
- Test motion and travel: Ensure smooth movement throughout the full range of operation.
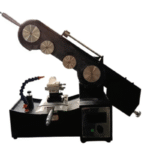
Pulley Installation and Alignment
Pulley alignment is absolutely critical for preventing wire breakage and ensuring smooth operation.
💡 Pulley Installation Tips
Runout causes wire flaking and breakage. Take these steps to ensure perfect alignment:
- Attach both pulleys (driver and idler) to their brackets securely
- Check alignment using a straightedge or laser alignment tool
- Measure and minimize runout (wobble) in each pulley
- Verify that pulleys align with the blade path and tracking guides
- Test rotation by hand to ensure smooth, strain-free movement
- Apply lubrication to all specified points per the manual
- Start initial cutting at approximately 40Hz for testing
Threading the Diamond Wire
Route the wire carefully over the pulleys following the cutting process diagram provided by the manufacturer. Pay close attention to bead spacing and wire contact points.
Critical: Tension the wire within manufacturer-specified levels. Proper tension ensures steady, secure operation with minimal strain. Too much tension can break the wire; too little causes wandering and excessive wear.
Monitor the wire’s position relative to blade guides and ensure it follows the intended loop path. Connect lubrication or coolant lines and verify flow. Perform a slow-motion jogging check to identify any rubbing, debris, or misalignment issues before cutting samples.
Calibration and Fine-Tuning

System Calibration Process
Precise calibration leads to repeatable wire cutting with minimal friction and vibration. Once installed, verify that cutting machine slides are balanced and properly centered in the loop track.
Starting Parameters
Begin with a low-speed warm-up to steady the wire run and spool. Adjust tension incrementally—too much tension breaks the wire, while insufficient tension causes undulation and excessive abrasive wear.
Cutting speed depends on several factors:
- Hardness of the sample material
- Type of surface finish required
- Cooling requirements to minimize friction
- Wire specifications and bead type
For automated systems, enter target RPM and feed parameters into the controller, then verify stability of slide travel motion. Store settings for each material type to ensure repeatability across projects.
Alignment Verification
Ensure the blade path is perfectly square to the sample surface. Check parallelism between guides and slide motion using precision measuring tools.
Alignment Verification Checklist
- Use a dial indicator to check runout in edge guides
- Adjust brackets to center the continuous wire exactly
- Watch spool payout for smooth, even feeding
- Verify feed direction alignment with the sample
- Confirm lubrication reaches the cutting zone
- Document all measurements for future reference
Test Cutting and Validation

Conducting a Test Cut
Use a sacrificial slab to validate your setup before cutting valuable samples. This test allows you to check kerf width, edge straightness, and surface quality.
- Start conservatively: Begin with conservative speed and tension combinations.
- Stabilize motion: Make incremental adjustments to minimize friction while maintaining control.
- Monitor cooling: Watch coolant flow and verify adequate wire cooling.
- Check debris removal: Ensure proper flushing—inadequate flushing causes bead glazing.
- Inspect the sample: Look for burn marks, microcracks, or taper indicating misalignment.
- Record settings: Document final settings for future reference and production consistency.
⚠️ Signs of Improper Setup
- Burn marks: Insufficient cooling or excessive speed
- Microcracks: Too much tension or improper feed rate
- Taper: Misalignment of guides or pulleys
- Glazed beads: Inadequate coolant flushing
- Chatter marks: Vibration or insufficient tension
Safety Protocols

Operator Safety Requirements
Safety protocols protect the operator, sample, and cutting machine throughout all phases of operation—from assembly to blade changes and regular cutting.
Pre-Operation Safety Checklist
- Clear the cutting area of unnecessary items and obstacles
- Install and secure all guards and barriers
- Test emergency stops to confirm engagement
- Verify lubrication and cooling systems are operational
- Check that pulley covers are in place
- Review feeding, speed, and control procedures
- Confirm lockout/tagout procedures are understood
- Verify wire tension, balance, and alignment
Personal Protective Equipment (PPE)
Emergency Procedures
All staff must be thoroughly briefed on emergency procedures before operating the equipment.
Recommend reading: Laboratory Diamond Wire Saw: The Complete Guide to Precision Sample Cutting