Get in touch with DONGHE Company
-
Phone: +86 181-1645-5490
-
Email: Sales18@DongheScience.com

Ceramic Cutting Guide: Methods and Best Practices
Cutting ceramic materials accurately is a process that requires not only the right tools but also a deep understanding of the techniques involved. It is a very important step to take, regardless of whether you are an expert artisan, a DIY lover, or just doing a home improvement project, so you do not make costly mistakes and get a perfect floor. This guide will include methods and best practices for working with ceramic, along with thorough information on tools, setup, and professional techniques.
Introduction to Cutting Ceramic

Ceramic cutting is shaping or resizing ceramic materials with a high level of precision so that they can be used for specific projects. This process requires the use of special instruments and methods for achieving neat and accurate cuts without ruining the material. The proper cutting of ceramics is crucial since ceramics have high durability but are also brittle, thus making them susceptible to chipping or breaking if not handled correctly.
The main tools for cutting ceramics are tile cutters, wet saws, and diamond-tipped blades, and all of them are made to keep the precision and to reduce waste of material. If the right equipment and careful preparation are there, then cutting ceramics can be done in a very efficient and effective way.
Understanding Ceramic and Its Applications
Ceramics are a part of a class of materials which are inorganic, non-metallic and solids to in general heat treated and made solid. Their hardness, chemical resistance, thermal tolerance and insulation are the fantastic combination of properties making them very adaptable to various industries. Their use is very widespread and seen in everyday life from tiles and cookware to cutting-edge tech applications in space, medicine, and electronics.
Modern Applications
State-of-the-art manufacturing methods, such as 3D printing and nanotechnology, have been responsible for the expanding range of ballistic applications where ceramics are the original. One such example would be the use of ceramics in the electronics field as their role is being insulators and substrates in circuit boards because of the absence of any hassle in electrical conductivity and the great thermal resistance.
Furthermore, bioceramics have opened new horizons for medical innovations through their use in dental implants, bone, and joint prosthetics that last due to their human body compatibility and thus, function well. The field of ceramic applications is still expanding through continuous brainstormings and research, thus confirming their role as a backbone in the development of modern engineering and consumer technology.
Importance of Proper Cutting Techniques

The use of proper cutting techniques is a necessary thing in all the industries that concern efficiency, accuracy, and safety. Proper methods will not only be the factor for good product quality but will also lead to less material wasted and more effective use of resources. Poor cutting can lead to defects, increased costs, and dangerous conditions.
1. Precision Cutting for Dimensional Accuracy
Precision cutting methods can minimize dimensional inaccuracies to a very small extent while supporting the progress of complex designs and even achieving very strict tolerances. This issue is crucial in the aerospace and electronics industries, where even the slightest falsehoods cause failures.
2. Optimized Material Utilization
The application of appropriate cutting techniques means less material to be discarded and thus an improvement in resource management. For example, CNC machines rely on preset controls to guarantee ideal cut plans that result in reduced consumption of raw materials, hence the process is environment-friendly.
3. Reduction of Thermal Impact
The proper cutting speeds together with cooling systems lead to the generation of very little heat thus no change in the material properties due to heat or the prevention of thermal expansion. This state is very bad for the industries dealing with metals, composites, or ceramics as they consider the material integrity as the main factor.
4. Improved Tool Longevity
Implementation of appropriate techniques can literally extend the life of your cutting tools by many years. The various methods such as proper feed rates, angles, and lubrication contribute to a significant reduction in the costs and downtime associated with cutting tool replacement.
5. Enhanced Safety and Risk Mitigation
By adhering to the cutting specifications, the dangers associated with tool failures or accidental chemical reactions in the materials are absolutely ruled out. For example, precision-controlled laser cutting systems not only ensure the safety of the operator but also minimize the risk of accidents occurring in the workplace.
Overview of Tools Required

The tools that are necessary for cutting processes of precision vary according to the material and the method, but they mostly include advanced machinery and systems controlled by software. Among the main tools are:
- Laser Cutting Machines
These are based on highly concentrated laser beams, which deliver cutting of high precision in metals, plastics, and other materials. The latest cutters come with CNC (computer numerical control) that significantly contributes to accuracy and efficiency.
- Plasma Cutters
Perfect for cutting through materials like steel and aluminum that can be electrically conductive. Plasma cutters make use of a very hot plasma stream that is moved quickly to create cuts with good precision, and this is suitable for industrial usage.
- Waterjet Cutters
The cutter operates by using very high-pressure water streams, with or without abrasives, to carve out the intricate designs in a variety of materials, including the ones that are sensitive to heat and might get deformed with other methods.
- CNC Routers
Mainly for cutting and shaping woods, plastics, and other soft materials. They also ensure accuracy with minimal human intervention and repeatability.
- Safety and Calibration Tools
Equipment like safety goggles, laser calibration systems, and protective enclosures are also necessary for the safety of the operator and for maintaining the accuracy of the tools.
The aforementioned tools, when paired with real-time monitoring and automated control technologies, are on par with current industry standards in terms of both efficiency and quality. The continuous advances in digital interfaces and machine learning have also optimized these systems further, making it easier for them to be integrated into smart manufacturing ecosystems.
Cutting Methods for Ceramic Tile

Cutting ceramic tiles can be performed in various ways according to the cutting method and the needed accuracy. If straight cuts are to be made, a manual tile cutter is the best option and it comes fast since it uses a scoring wheel to make a clear break through the tile. If the case is that there is a need for complicated or curved cuts, a wet saw that has a diamond blade is the right tool since it can cut exactly and prevent chipping as well.
Tile nippers are usually the tools that accompany the cutting of detailed shapes or making very slight edge adjustments. Also, the scoring and snapping technique with a glass cutter is a method employed for simple cuts in small tiles. Every method’s selection is based on the characteristics of the ceramic material and the project’s specific requirements.
Using a Manual Tile Cutter
Using a manual tile cutter is a fantastic method for making a sharp cut out of ceramic tiles and it especially excels in creating cuts with straight edges. This tool works by putting a thin line on the tile surface and then applying pressure to separate the tile along the line that has been scored. In both cases, the homeowners and the pros are asking for advice on making straight cuts without any loss of material.
Step-by-Step Process
- 1
Prepare the Tile and CutterCleaning the tile and freeing it from dust is the first step for the cutting mechanism to work smoothly. The manual tile cutter should be adjusted to the tile’s size and the cutting wheel positioned correctly on the cutting line.
- 2
Mark the Cutting LineA very bright and straight line should be drawn on the ceramic tile’s glazed surface with the help of a pencil or a marker indicating the area of cutting. This phase is very significant as it will assure the scoring part to be accurate.
- 3
Position the TilePlace the tile on the cutting table of the manual cutter and the marked line in line with the guide bar of the cutter. The tile needs to be very securely positioned so that it does not get moved during scoring and snapping.
- 4
Score the TileThe cutting wheel should be lowered with just a bit of force onto the tile right at the start of the marked line. Steady pressure should be applied as the scoring wheel is pushed or pulled across the surface in a continuous motion. Do not make more than one pass with the wheel as it could ruin the glaze and degrade the quality of the cut.
- 5
Snap the TileWhen the tile is scored, position the breaker bar in the middle of the scored line and apply it. To do this, apply strong and controlled pressure so that the tile can be broken cleanly along the scored mark.
- 6
Check and Refine the CutExamine the cut edge for any unevenness. If so, then a rubbing stone or sandpaper should be used to smooth the rough edges and obtain a professional finish.
Provided the above-mentioned steps are observed and good practices adopted, the manual tile cutter will be a reliable instrument for cutting accurate pieces. The method is easier than setups with more sophisticated tools such as wet saws and has a lower error rate.
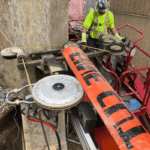
Employing a Wet Saw
A wet saw is an essential tool for tile cutting, providing a precise cut and being the only way to cut harder materials like porcelain or stone without damaging the piece. The wet saw equipped with a diamond blade and a water-cooling system ensures the blade does not get too hot while at the same time generating less dust during the cutting process.
Wet Saw Operation Guide
- 1
Prepare the EquipmentThe wet saw water reservoir is to be filled initially according to the manufacturer’s directions. The diamond blade needs to be examined for any signs of wear, and if there are such signs, it must be replaced before use.
- 2
Mark the TileDraw a precise and straight line on the tile with a grease pencil to mark where the cut will be made. Verify the measurements to ensure that they are correct.
- 3
Position the TileThe tile must be positioned on the cut surface of the saw such that the blade is just over the marked line. Make use of the saw’s adjustable fence to control the cut and keep it straight.
- 4
Start CuttingPower on the wet saw and let the blade reach the highest speed. Gradually push the tile towards the blade while applying light and constant pressure at the same time, allowing the saw to do the cutting work. It is crucial not to apply too much force as that may lead to uneven cuts or even breakage.
- 5
Inspect the Final CutAfter the cut is made, turn off the wet saw and examine the tile. If there are any sharp edges, remove them with a rubbing stone.
These careful procedures followed, a wet saw can produce extremely clean cuts and great accuracy, even for intricate designs or the hardest materials. The combination of precise engineering and fastness has made the wet saw an essential tool for the professional tile layer.
Angle Grinder Techniques
Cutting tiles with an angle grinder requires not only precision but also a good technique to achieve the desired results without any flaws. The first step is to draw a clear cutting line on the tile using either a pencil or a marker. Next, fix the tile onto a very sturdy surface so there will be no movement during the cutting process.
Now, attach a diamond blade to the angle grinder which is specifically manufactured for cutting tiles, this will help in getting the cuts smooth and also in prolonging the life of the blade. Grip the grinder tightly using both hands and position the blade over the marked line. Gradually lower the blade into the tile while keeping a constant pressure and moving the grinder along the line. Do not push the blade as this could lead to chipping or cutting unevenly.
For making curves or intricate patterns, guide the blade softly, and in a controlled and slow manner, to take the shape you want. Always wear the right protective gear which mainly includes goggles and gloves to prevent injuries from dust and sharp edges.
Tile Nippers for Precision Cuts
Tile nippers are a great way to go when it comes to cutting tiles with high precision, particularly if they are small or have an unusual shape. In order to utilize tile nippers properly, position the jaws of the tool over the area you wish to remove then apply considerable force in order to chip off small bits. Go on gradually, removing small fragments at a time so that you do not cause cracking of the tile.
Using this technique, you can have tiles matched to fit around the fixtures or even create curves. It is very important to constantly wear safety goggles because the eyes are susceptible to injury from the hasty removal of small pieces.
Glass Cutter for Thin Ceramics
The glass cutter is a fantastic tool that makes it possible to copy and fracture even very thin tiles made out of ceramic like a pro. The process is simple: the glass cutter is set up on the line where the tile is going to be cut, and then constant pressure is applied until there is no longer a visible score on the surface of the tile. After scoring, it is time to break the tile along the scored line, either by applying consistent pressure or by using a tile breaking tool.
The method is most effective for straight cuts through smooth, thin ceramics. As a precaution, it is advisable to wear masks and gloves to reduce the risk of cuts from sharp edges or broken pieces of the tile.
Best Practices for Cutting Ceramic Tile

- ✓
Use the Right Tools: Choose equipment that is made for the cut type, e.g. a tile cutter for straight cuts or a wet saw for intricate patterns and thick tiles. - ✓
Measure and Mark Accurately: A tape measure an a pencil or marker should be used to indicate the cut lines, with all measurements rechecked before cutting. - ✓
Ensure a Stable Workspace: Working on a level surface with no-slip properties will make it easier to cut the tile without it moving and will also keep it stable. - ✓
Work Slowly and Carefully: Scoring or cutting the tile with a consistent amount of pressure will lessen the chance of getting cracks or having uneven edges. - ✓
Wear Protective Gear: Goggles and gloves should be used all the time to receive protection against sharp pieces and dust during the cutting operation. - ✓
Inspect Edges Post-Cut: Rough areas should be made smooth with the help of a tile file or sandpaper after cutting for both safety and fitting purposes.
Safety Precautions
- Use Proper Ventilation:
Make sure that the place you work in is adequately ventilated so that the exposure to dust and fumes that may arise from the cutting process is minimized.
- Check Tools for Integrity:
Before using, check all the tools for any damage or wear and tear. This way, you will not have any malfunctions that could result in injuries.
- Secure the Workspace:
Get rid of items that you do not need and keep the area clean and organized to reduce the chances of accidents.
- Follow Manufacturer’s Guidelines:
Follow the instructions that come with the tools and materials so that you can use them safely and effectively.
- Dispose of Debris Safely:
Tile pieces and dust should be disposed of properly to avoid injuries or harm to the environment.
Achieving Clean Edges and Precision

To effectuate clean borders and accuracy during tile cutting, it is recommended to use a premium tile cutter or wet saw that comes equipped with a sharp blade specifically intended for the material type that is being cut. Make the cutting line visible very clearly employing a straightedge and pencil or marker to guarantee precision.
While making the cut, exert pressure that is steady and even to avoid chipping or ending up with uneven edges. For intricate cuts or irregular shapes, it is advisable to use a tile nipper or rotary tool with a compatible bit. It is necessary to always polish the edges with a fine-grit sanding block or file to get rid of roughness and improve the finish.
Tips for Cutting Curves and Shapes
- Use a Tile Nipper for Small Adjustments
Tile nippers are perfect for slowly removing small parts of the material while making intricate curves or shapes. It is better control that one by biting off little pieces and that allows you to make the final shape. Always clean the cut very sharply to produce smooth edges.
- Apply a Wet Saw with a Diamond Blade
A wet saw with a diamond blade is very efficient when it comes to large curved cuts. The tile has to be moved carefully and slowly along the marked curve allowing the saw to cut and at the same time chipping icicles to be minimized. The water flow cools the blade and dust is reduced.
- Use a Rotary Tool for Precision
A rotary tool with either a diamond or carbide bit is capable of doing the most intricate curves and the tiniest angles. Hardly any other tool can give you such precision in minor parts and it is also very useful with odd or funky shapes. Just make sure you keep your hand steady to follow the outline closely.
- Mark the Curve Clearly with a Template
In order to get the desired shape, a flexible template or stencil should be used to trace over the curve that you want to cut. This way you will have a very clear guideline which makes it unlikely to make mistakes or have the shape uneven. For marking on the tiles, a pencil or a wax pencil is the best choice.
- Sand and Polish the Cut Edges
After the cut, the edges of the cut can be smoothed with fine-grit sandpaper, a sanding block, or a tile file. Polishing the edges not only gives the final piece a better appearance but also guarantees safety by eliminating sharp or rough areas.
Choosing the Right Cutting Tools
Choosing the right cutting tools for tiles will rely on the type of tile and the cuts needed to be done. A manual tile cutter can be used both effectively and precisely for straight cuts on ceramic or porcelain tiles. The most proper tool for operating a diamond blade wet saw would be the one that requires curved or complicated cuts, since the tool produces the cleanest and most accurate results.
Still, handheld tools like tile nippers are mainly used for minor or intricate changes. Always check that the tool is specifically made for your tile type to ensure a good result without causing any damage to the tile.
Comparing Tile Cutting Tools
Choosing among the tile cutting tools always depends on the tile type, the cuts’ precision and complexity. Manual tile cutters are the best option for straight cutting of ceramic or porcelain tiles, and they are quite economical for regular projects. However, wet saws with diamond blades are perfect for precision cuts, especially with natural stone or intricate shapes.
Tile nippers are only recommended for small and very detailed adjustments or cuts to fit irregular shapes, while they are not suitable for big works. If you want to get the best result, always choose the tool that is designed specifically for the kind of tile you are using. It should cut cleanly and produce minimum waste or damage at the same time.
Tungsten Carbide vs. Carbide Wheel Cutters
Tungsten carbide cutters possess the necessary traits of hardness and durability to fit both heavy-duty and precision tasks perfectly, while carbide wheel cutters are more often used for smooth, straight cutting, and general applications.
Understanding the Use of Plier and Nipper
The implementation of tools that consist of nippers and pliers, besides having different features and designs, also have widely different but very important uses. Pliers, or gripping tools, are really the best and the most reliable option in many operations like holding, bending, or cutting wires and other materials. They have a pivoting joint that enables applying the maximum grip and the highest torque thus making them very much needed in electrical work, machine repairs, and construction.
In addition to regular pliers, there are many other types, such as needle-nose or locking, which are meant for various applications, for instance, working with fine parts or securely gripping a subject, respectively.
As for nippers, they are not such a creator’s multipurpose tool as a specialist’s working ally. They are still among the cutting tools even though they use sharp nests. Nippers’ angled jaws are so sharp that they can even cut through the thinnest of wires, tiles, or metals like soft copper, etc. Nippers are mostly used in the fields of jewelry, ceramic tile cutting, or orthodontics where very clean and fine cutting precision is required. Besides, their small size and ergonomic design give them the ability to operate in very precise and controlled situations.
It is crucial to understand the advantages of the different types of tools used for a specific task before going for a tool. In such situations, pliers would be the tool of choice and nippers are best for precision cutting.
Common Mistakes and How to Avoid Them
1. Using the Wrong Tool for the Job
The error that often occurs is to choose pliers when nippers are needed or vice versa. The situation can result in either the technician being unhappy because of poor results or the production of the material being unintentional. To avoid this situation, familiarize yourself with the characteristics of every tool and select the one that is appropriate for the task.
2. Applying More Force Than Necessary
The application of excessive tonnage can either cause the tool to break or the material to lose its shape. Always work with the tool in the way it was intended and regulate the amount of pressure you use so that you do not put unnecessary strain on the tool.
3. Neglecting to Maintain the Tools Properly
Failure to clean and take care of the tools can lead to the cutting edges becoming dull and, consequently, poor performance. Periodically inspect the tools, clean them after each use, and sharpen or replace cutting edges as needed.
4. Improper Handling
Tools are being mishandled when they are used at uncomfortable angles or without proper control. Make sure you have a firm grip on the tool and the workpiece is securely held in place before you start.
Recognizing these common problems and taking preventive measures can help users to increase efficiency, extend the life of tools, and improve the quality of their work.
Over-Exerting Pressure on the Cutter
When the machine exceeds its limits in cutting operations, this not only increases the chance of tool wear but also results in a finished product that is less accurate and of lower quality. On the other hand, a significant number of users are curious about how to prevent tool breakage from excessive use.
The way to uncover the answer is by being familiar with the material properties and the cutter specifications. It is imperative for users to choose cutting tools that have the right balance of hardness and sharpness corresponding to the processed material so that they can get along well. To make sure that there is no excessive pressure caused, proper feeding rates, lubrication and letting the tool work at its efficiency will not only minimize the pressure but also lead to the tool having a long life across operations maintenance-free and consistent performance.
Ignoring Safety Gear
Unprotected use of workers in the workplace with their respective the most protective gear possible drastically increases the chances of very grievous injuries and chronic health problems being encountered. Safety gear, including gloves, masks, and ear protection, serves as a very important barrier against dangers like, for instance, sharp instruments, pieces of material or dust being blown around, and very high levels of noise.
In the absence of this protection, the staff have a greater chance of suffering from cuts, scrapes, eye injuries, and hearing loss. Compliance with the rules regarding personal protective equipment (PPE) is important for the safety of the workforce and incidence of accidents that can be avoided to a great extent.
Failing to Measure Accurately
Inaccurate measurements can produce errors of a significant magnitude that would ultimately affect the project negatively with regard to both integrity and functionality. The first step in ensuring the right fit of materials, their proper alignment, and the meeting of specifications is by making accurate or precise measurements.
This holds true for areas such as construction, manufacturing, and engineering where even one small error might cause a whole range of problems that include weak structures, high material wastage, and financial losses. Besides, the use of proper measurement techniques, routine calibration of measuring devices, and checking measurements at critical points are some of the steps that can not only avoid the risk of falling short of quality standards but also help maintain the quality standards.
Frequently Asked Questions
What are the key challenges in cutting ceramics?
The cutting process has the advantage of being extremely precise with the use of specific tools and techniques which can control the removal of the ceramic material in such a way that no damaging vibrations or thermal shock are induced. However, cutting ceramics is tough since they are numerous and among the hardest of materials yet their brittle nature adds to the difficulty of handling them. That is why they are prone to microfracturing, chipping, and complete failure when the applied mechanical forces are not right.
Which tools are the best for cutting ceramics with high precision?
The cutting tool best suited for the job is determined by the thickness, hardness, and precision of the material required.
- Diamond Saws (Wet Saws): These are the most commonly used saws in the industry that are good enough to make straight and clean cuts in all kinds of ceramic materials including tiles and plates. They consist of a circular blade where the diamond grit is mounted and a water-based cooling system helps to keep the temperature at a manageable level while producing little dust.
- Manual Tile Cutters: For thinner ceramic tiles, a manual cutter that scores the surface first and then snaps the tile along the line is a practical method for making straight cuts.
- Angle Grinders with Diamond Blades: These are very versatile tools but they require a skilled hand to maintain precision as they are the ones who can do curved, notched, and adjusted cuts.
- Diamond Wire Saws: For cutting of intricate shapes or very hard technical ceramics, diamond wire saws are the most accurate and less material wasting method, thus they cause the least subsurface damage.
Why is coolant used in the cutting of ceramics?
Application of coolant that is mainly water is recommended as a critical best practice. The coolant’s primary purposes are to absorb extreme heat generated by the friction at the cutting interface and to diminish the production of fine dust. Heat that is not controlled can result in thermal shock which would produce cracks in the ceramic workpiece. Besides, the coolant acts as a lubricant to the blade and also washes off the debris which means that the tool life is extended and the cut is cleaner and more precise.
What techniques are there for reducing chipping and fractures during cutting?
Ceramic material damage can be prevented by adjusting the cutting parameters correctly.
- Choose the Right Blade: The type of diamond blade must correspond to the ceramic type being cut. The soft-bodied ceramic blade for hard porcelain will definitely chip the latter.
- Control the Feed Rate: Snappy pushing of the material through the saw results in increased mechanical stress. A slow continuous feed rate assists the diamond grit in grinding the material effectively.
- Make Workpiece Stable: The ceramic piece must not be shaken so it should be firmly placed on a flat and stable surface as vibration is one main cause of chipping and fractures.
- “Dressing” the Blade: A diamond blade that has lost its glaze or has become dull can get its performance renewed by passing through a soft abrasive material. This process aids in shedding the bonded debris and unmasking a new diamond grit for optimum performance.
What are the main safety precautions taken during the cutting of ceramics?
The cutting of ceramics produces dust which contains crystalline silica, and that dust is a respiratory hazard. Therefore, it is very important to follow strict safety protocols.
- Respiratory Protection: Wear a correctly fitting respirator (e.g. N95) all the time in order to avoid the inhalation of silica dust.
- Eye and Hearing Protection: Use safety goggles or glasses in order to protect your eyes from the debris that might fly around. Hearing protection is recommended in the case of power saw use.
- Wet Cutting: If possible, use a wet saw as this will greatly lower the quantity of dust that is airborne by making it settle at the source.
- Good Ventilation: Have a well-ventilated workplace as this will assist in dispersing any dust particles that might be left in the air.
What is the difference between the cutting of ceramics and that of porcelain?
Both materials are the same, however, porcelain is denser, harder, and less porous than standard ceramic tile. Thus it is more difficult to cut porcelain, which is the reason it needs more power and a blade made for hard materials. A standard ceramic blade would cause rapid tool wear and a high likelihood of chipping the tile if used on porcelain. A wet saw fitted with a continuous-rim diamond blade specifically designed for porcelain is the tool of choice for a clean cut.
Reference Sources
- How To Cut Ceramic Tile: Tools & Best Practices – RUBI
Explains and discusses a variety of tools including manual tile cutters, wet saws, diamond blades, etc., as well as the best ways to cut ceramic tiles. - Comprehensive Guide to Cutting Techniques for Ceramic Materials
The avant-garde methods of laser cutting, grinding, and ultrasonic machining for ceramics are discussed in detail. - Machining Ceramic
The article describes techniques of diamond grinding pins and coolant usage to prevent micro-fracturing in fully-sized ceramics. - Mastering The Art of Ceramic Cutting: Tips and Essential Tools
Introduces tools such as manual tile cutters and snap cutters for making both straight and diagonal cuts in ceramic fabrication. - The Best Tools for Cutting Ceramic: What Should You Use?
Discussion regarding electric, tile, and circular saws for the purpose of cutting heavy and thick ceramics with accuracy and precision. - Recommend reading: Hard and Brittle Material Cutting Wire Saw | Precision Diamond Wire Saw Machine
These references include a variety of both traditional and modern techniques for efficient cutting of ceramics. After reading this article, you will not only have the wisdom but also the confidence to carry out even the most challenging ceramic cutting assignments like a master.